Thumbtack helps customers tackle their to-do list by connecting local professionals with the right customers all across the nation. Our teams are focused on building out this two-sided marketplace and creating the tools to enable pros to manage and scale their business.
When it comes to building products, Thumbtack takes a data-driven approach that relies heavily on experimentation and iteration. At any given point in time, we’re running dozens of A/B tests that touch multiple features and product flows.
However designing A/B tests correctly is not always simple, given the marketplace nature of our platform and the breadth of categories we support. In this blog post, we’ll discuss some of the challenges in setting up A/B tests and explore the evolution of Seedfinder, the infrastructure we built to allow our data scientists to sleep more soundly.
One major challenge in designing an A/B test is accounting for inherent imbalances between test buckets. In one instance, we performed an A/A test comparing the same version of landing pages in different markets and saw a 5% lift in metrics for the treatment vs. baseline bucket. Pre-experiment imbalance affects our ability to draw reliable conclusions from experiment results.
This issue can be mitigated through repeated randomization of A/A tests to find a seed that balances metrics adequately across experiment buckets. More info can be found in this blog post, including all the statistics behind this approach.
Initially, our data scientists manually ran R/Python scripts to account for pre-experiment imbalance. These scripts required a lot of attention and took several hours to run. While this ad hoc approach allowed us to run certain experiments, this process clearly would not scale as the number of experiments increased.
As Thumbtack continues to grow, so does the complexity of experiments. There is an increasing number of experiments that target a specific subset of users. Instead of placing an additional burden on data scientists, we want to enable developers to easily describe the population to experiment on.
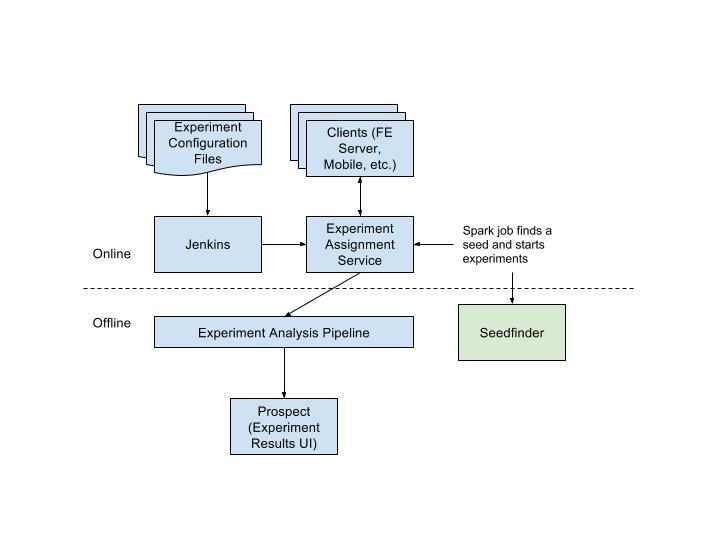
In order to keep up with the increasing demand for experiments, we built a self-serve automated system for setting up experiments. Here’s how our infrastructure evolved over time.
As part of the service-oriented architecture migration efforts, experiment assignment logic was broken out to its own service.
To start a new experiment, developers can commit a configuration file to a git repo which automatically syncs the experiment definition to the Experiment Assignment Service (EAS). Clients can then reference this experiment in code (website, mobile, or other services).
In order to move from a manual process using R/Python scripts to a fully automated system, we first needed to improve the performance of the existing process.
The biggest pain point of our previous setup was the time it took for the R/Python scripts to run. These scripts often took hours on a laptop because 1) the scale of our data and 2) the thousands of iterations of repeated A/A tests. However, the nature of this computation lends itself to parallelization. We leveraged our existing data infrastructure and rewrote the scripts using the distributed computing framework, Spark.
Our current data infrastructure is built on top of Google Cloud Platform. We use a combination of Google Cloud Storage, Google Cloud Dataproc (Spark) and Google BigQuery (SQL) to power our offline jobs. For more details, check out this blog post on our journey moving to GCP.
The Seedfinder Spark job is triggered when a new seedfinder experiment is synced with EAS. This new experiment will be in a “pending” state until the Seedfinder Spark job successfully finds a randomization salt and updates EAS.
The Seedfinder job now takes only minutes — a 10X improvement in runtime and saves the operational overhead for our data scientists by automating the end to end process.
As Thumbtack continues to grow, so does our need to experiment on a specific subset of our users. To address this need, we added a feature that lets developers specify the subset of users for an experiment via a reference table.
A reference table contains the set of users who should participate in the experiment. This table is automatically exposed as a BigQuery table when developers commit SQL logic to a git repo. Developers can configure their experiments to use reference tables in experiment configuration, and the Seedfinder Spark job reads data from reference tables as necessary.
Here’s how the Seedfinder architecture looks like today:
There are a couple of things we learned along the way:
In a traditional imperative language, errors are mostly handled by a try
and catch
clause. For example, if we are reading something from DynamoDB, we can handle it using the following pattern
1 | try { |
In this way, the response is of type Option
and can be pass along to downstream logics and eventually be handled when it is used.
1 | ddbContentOption.fold { |
Use Option
to pass along exceptions is easy, but also is very limited in terms of the types of exceptions being handled. A more powerful mechanism was introduced in Scala 2.10
, i.e., the Try
keyword.
Try
can be used to wrap around methods, which results in an instance Try[A]
that 1) if the computation is successful, it’s an instance of Success[A]
, simply wrapping the value of type A
; and 2) if the computation errors out, it’s an instance of Failure[A]
, wrapping a Throwable
.
Going back to our toy example, we can rewrite it as
1 | import scala.util.Try |
Working with Try
values is very similar to Option
- you can use all the typical functional sugar with it, such as getOrElse
, map
/flatMap
and for comprehensions.
Specifically to Try
, you can use isSuccess
to check if the computation is successful; or use pattern matching to handle success and failure accordingly.
1 | import scala.util.{Success, Failure} |
Moreover, you don’t have to use getOrElse
to set default values for Try
. Instead, you could take advantage of the recover
or recoverWith
methods, which returns a Success
by applying a partial function on the given Failure
instance.
Alternatively, people are also using Either
for this purpose. But, similar to Option
, Either
has its usage outside of error handling.
Either
takes two type parameters A
and B
. An instance of Either[A, B]
is either an instance of A
or an instance of B
, which is defined by two sub types Left
and Right
. For example, an Either
is a Left
if it is an instance of A
.
In error handling, the convention is to use the Left
to represent the error case and Right
for the success value. Therefore, our DynamoDB example can be wrapped using Either
in this way
1 | val ddbContent: Either[String, DdbContent] = |
In downstream, we can use pattern matching to handle success or failure.
1 | ddbContent match { |
Unlike Option
or Try
, Either
is unbiased, which means you need to choose the assumption that it is a Left
or Right
by calling .left
or .right
. Then you will get a LeftProjection
or RightProjection
as a left or right biased wrapper for the Either
.
Scala provides a couple of nice APIs to work with error handling, such as Option
, Try
and Either
. It prefers these functional style handling as opposed to the more traditional try
and catch
with side effects. With a few caveats, you can work with these APIs using standard funcitonal sugars.
In this post, I will try to lay out a strategy to identify side-project opportunities that can actually get you some passive income. Note it’s not going to get you rich over night, but hopefully you could earn a steady income flow. You ask how? We will use our old pal Google to shed some insights on us.
One of the best way to find massive demand is through Google keywords. Billions of search queries are processed by Google per day, which collectively reflect at least millions of demands.
If we can leverage that information to our advantage, we can identify a market small enough that no giant companies are present, but large enough for us to earn a significant amount of income. You might be curious how to get this data. Well, guess what, our friend Google is providing that information to us for free through “Related searches”!
Quiz: what can you find as a good side-project idea if you search “instagram download” and look at its “Related queries”?
The query “instagram download photos” immediately stands out. The official website/app doesn’t provide this functionality for obvious reasons, but apparently there is huge demand here (it’s a no-brainer since it is a simple query involving “Instagram” and it ranks high)!
Now we have a general idea of the demand, we need to do a little bit of research on existing competitors before spending time coding. After all, we as programmers earn a good amount per hour coding anywhere.
The research also involves using Google ;) Basically, you just search the query, e.g. “instagram download photos” in our case, and see what the top results are. After that, I often look them up in SimilarWeb, who would tell you what’s their monthly traffic and other statistics. It gives you both an idea of how large the market is, aka how much you could potentially make, and how fierce is the competition.
A level deeper, you should also learn how your competitors are attracting traffic. One way is to use ahrefs.com to look at their top referring contents. This is super helpful when you start to market your product.
With these information in mind, I find it also really helpful to actually experience with the competing products. You need to learn from them and see if you have a good idea in terms of innovation or usability. If you do, now it is the time to start coding.
Seize this type of opportunities is all about moving fast. Your side-project is no-longer a laid-back toy project, you now have a purpose in mind so go and ship fast! You want to have something out there and start to market it as early as possible so that your site can start to move up in search rankings. At the end of the day, it’s all about SEO since the initial opportunity is found directly through search engine.
This is something that myself started to explore. It provides me with a good motivation to ship my side-projects and a great experience to run a start-up like business on the side.
As always, I would really appreciate your thoughts/comments. Feel free to leave them following this post or tweet me @_LeiG.
]]>In the rest of this post, I am going to walk you through some basic caching patterns using Guava. Note that, this is inspired by, but not limited to caching predictive models. As a reference example, we assume the goal is to serve a machine learning model, which is updated daily, in a web application built by the Play Framework.
To start with, a simple caching pattern is to load the model in-memory and evict it after a given time period (daily in our case). In our particular case, we will use CacheLoader
, since there is a default function (the machine learning model) to load associated with a key (model identifier); otherwise, you will need to pass a Callable
into a get
call.
With dependency injection, you could create a CacheProvider
for caching.
1 | package controllers |
In this way, the cached model is evicted after 24 hours. For the immediate next query after eviction, the service will hang there until the model is loaded again so a higher latency is expected.
For timed eviction, if things went wrong during reloading, the service won’t be able to return anything because the old model is already evicted. This is of course is not ideal and may cause serious problems.
Instead, a better solution maybe timed refresh. The difference is that the old model (if any) is still returned while the key is being refreshed. Therefore, even if an exception is thrown while refreshing, the service is still able to return results from the old model, while the exception is logged and swallowed.
The change to switch from timed eviction to timed refresh is minimal - you just need to replace expireAfterWrite
with refreshAfterWrite
.
The defauled refresh loads value synchronously. That means, the service will still hang there waiting for the new model to be loaded. This makes queries to have high latency during refresh and, thus, bad user experience.
Good news is that there is a way to set up the CacheBuilder
such that refresh happens asynchronously. Specifically, you need to overwrite the reload
method to be asynchronous.
1 | package controllers |
Caching is one of the most interesting problems in web applications. Here I only talked about some most basic in-memory caching patterns, but they, especially the timed asynchronous refresh, seem to work well with predictive models, which is relatively static compared to other content.
As always, I would really appreciate your thoughts/comments. Feel free to leave them following this post or tweet me @_LeiG.
]]>Today machine learning models are often trained on a large Spark cluster to take advantage of its powerful distributed computing capability and easy-to-use APIs. Since the offline training part is not the focus of this post, I will just build on top of a toy training pipeline from the official Spark tutorial
1 | import org.apache.spark.mllib.classification.{NaiveBayes, NaiveBayesModel} |
There are a few model storage options and I decide to use S3 for its simplicity and avaliability. Moreover, Spark provides nice support to save serialized model directly to S3. All you need to do is to configure your SparkContext
with the right S3 credentials and then add the following lines to the previous code snippet.
1 | sc.hadoopConfiguration.set("fs.s3a.access.key", YourAWSAccessKeyId) |
If you go to your AWS console, you could find .parquet
files stored under your S3 bucket persisted-models/naivebayesexample
, which represent the model internal serialization logic of Spark.
Note that I am using the s3a
URI schema to interact with S3. There are in total three variants as described in https://wiki.apache.org/hadoop/AmazonS3
S3 Native FileSystem (URI scheme: s3n) A native filesystem for reading and writing regular files on S3. The advantage of this filesystem is that you can access files on S3 that were written with other tools. Conversely, other tools can access files written using Hadoop. The disadvantage is the 5GB limit on file size imposed by S3.
S3A (URI scheme: s3a) A successor to the S3 Native, s3n fs, the S3a: system uses Amazon’s libraries to interact with S3. This allows S3a to support larger files (no more 5GB limit), higher performance operations and more. The filesystem is intended to be a replacement for/successor to S3 Native: all objects accessible from s3n:// URLs should also be accessible from s3a simply by replacing the URL schema.
S3 Block FileSystem (URI scheme: s3) A block-based filesystem backed by S3. Files are stored as blocks, just like they are in HDFS. This permits efficient implementation of renames. This filesystem requires you to dedicate a bucket for the filesystem - you should not use an existing bucket containing files, or write other files to the same bucket. The files stored by this filesystem can be larger than 5GB, but they are not interoperable with other S3 tools.
I choose to use S3A is because 1) it is an object-based overlay on top of S3, unlike S3 Block FileSystem, and 2) it has better performance and suports object up to 5TB compared to S3 Native FileSystem with 5GB object size limit.
Now let’s come to the online serving part. To save some time, I am assuming you already have a Play application up and running (I may write a follow-up post to explain how to set up a minimal web application using the Play Framework, which should be fairly straightforward). For now, let’s also assume the project name of the Play application is yoda
and its skeleton looks like the following.
1 | yoda/ |
The trained model is saved on S3 already at this moment, what we want is to load up the model in memory for yoda
. To achieve this, additional dependencies need to be added to the web application. Specifically, we need to add
guava
: dependency injection and cachehadoop
: read files from AWS S3spark
: deserialize parquet files to Spark ML model and make predictionsYou can add these dependencies in the build.sbt
file by adding the following lines.
1 | libraryDependencies ++= Seq( |
With these dependencies, we can now load trained model from S3 to memory. Note that we can use some cache mechanism to keep the model in memory for prediction and refresh it if the model is updated. For similicity, we are going to keep the model in memory and refresh every 24 hours in this toy example. More complex caching logic should be use case specific.
The logic can be added to CacheProvider.scala
under controllers/
, i.e.
1 | controllers/ |
such that
1 | package controllers |
Essentially, the web application yoda
runs a Spark in local mode and use its built-in functionality to load the saved model from S3. This approach is pretty generic in the sense that all types of models .save
to S3 can be loaded in memory by a web application with minimal code changes.
Once the Spark ML model is loaded in memory, making prediction based on incoming request is straightforward. Most Spark ML models have a built-in .predict
method that takes in an array of features and returns a prediction score.
You can add the following lines to your Application.scala
to make predictions on randomly generated features.
1 | package controllers |
Building machine learning models are fun and challenging, but, at the end of the day, we want to serve them to our users. This often means expose some endpoints in a web service. The described method in this post aims to provide a generic way to serve all kinds of machine learning models to improve the experience of our users.
As always, I would really appreciate your thoughts/comments. Feel free to leave them following this post or tweet me @_LeiG.
]]>Do you find yourself refresh that page for the 18 times? Do you find yourself run the script every time before deployment to uglify the page? There is a ton of room for automation here!
Most famously, the Front-end world seems to be using Gulp or Grunt for this kind of task (this statement may be false very soon with the speed of tool iteration in the JS community). Not to spark any debates here, but I am pretty happy with Gulp, mainly because of its pipelining operators feels very functional.
This post outlines a simple setup that I borrowed from various places and it should be enough to get you started with automating many of the repetitive tasks.
Setting up Gulp is relatively straightforward, you first need to install Gulp globally to use it as a command line tool. With yarn
, this is as easy as
1 | yarn global add gulp |
For Gulp to run within a project, at the root of the project folder, you need to create a gulpfile.js
file with
1 | var gulp = required('gulp'); |
A common use case of Gulp is to automatically uglify/minify the .css
, .js
and .html
files. This is a required step before any front-end deployment to reduce the size of files being shipped to clients. A few packages are used to achieve this goal, which can be introduced as development dependencies for your project by
1 | yarn dev add gulp-clean-css, gulp-uglify, gulp-contact, \ |
Another use case is to generate various size of an images for responsive design. It usually means modify the dimension and quality of an image so that it could be displayed reasonable and fast on either desktop or phones. That’s a part of the UI usually requires constant iterations and refinement. A handy package can be used to save time by auto modify images as you iterate.
1 | yarn dev add gulp-responsive |
Lastly, and this is a killing feature in my eyes, Gulp saves you from refreshing the page hundreds of times – an inevitable action during front-end development. The way it works is Gulp runs a test web server that constantly watching the directories and refresh the page once it detects a change. For this to work, another package needs to be installed.
1 | yarn dev add gulp-webserver |
Assuming you put all the raw files inside a source
folder and want to have your optimized files inside a build
folder, you could add the following code into the gulpfile.js
to achieve all the automation listed above.
1 | var gulp = require('gulp'); |
And, with that, you could just hit the following command in the project’s root directory and watch magic to happen.
1 | gulp |
AWS provides various storage options such as file storage system S3 and NoSQL database DynamoDB. This post summarizes the differences between these two services and how/why we choose one over the other. Bear in mind that the comparison between two services here is based on our specific use case.
Fundamentally, S3 and DynamoDB are different storage systems - one is a file system and the other is a database.
S3 is basically a file storage system that treats everything as an object
. But, before that, there is the concept of a bucket
. This is essentially a top level folder that is used to group the data from your various applications. For example, you could you one bucket
that stores your log files and another bucket
to backup your database. You could configure different permission and other settings for each bucket
.
Besides bucket
, S3 actually doesn’t have a folder structure per-se. That means, S3 treats everything inside of a bucket
as a group of a flattened group of object
.The listKey
API would return the keys, or, file names, in layman’s term, of all object
within a bucket. However, you can somewhat force a folder structure by naming object
with a prefix such as example/
so that the object
is stored as example/foo
in the bucket. To list all keys within that “folder”, you can pass a prefix example/
to the API.
A object
in S3 can be as large as 5TB so it’s very suitable for storing large objects. The latency is higher than DynamoDB but it supports concurrency out of the box, which means you can do a lot more things without worrying too much.
S3 has basic HTTP compatibility so that any applications can be pointed straight to a bucket
. It also supports versioning so that you can keep multiple variants of an object
in the same bucket
, although you need to turn it on deliberately as it’s off by default.
DynamoDB is a No-SQL database that can be used as a key-value store. Its selling point is the low latency/high availability and the scalability. It is really good for storing a lot of small items, since one of its limitation is the 400kb item size limit (including the binary length of both attribute name and attribute value), which was sort of a deal-breaker for our use case, since some of the model metrics could be pretty large given the size of the dataset.
Every value stored in DynamoDB is keyed by a unique primary key that is consisted of a hash key and a range key. AWS suggest to keep the hash key unique as well for ensuring uniform load distribution, but it’s not required. Because of its database nature, DynamoDB has better query performance with reasonable index structures and, thus, scan is generally discourage.
Each DynamoDB table has three geographically distributed replicas on SSD to ensure high availability, low latency and data durability.
The pricing models are also drastically different for two services, the cost of which could be huge if one doesn’t make a thoughtful choice based on usage.
S3’s pricing model is straightforward - it essentially charges a unit price per GB usage. Specifically, AWS charges a storage price, a request price and a data transfer price. The price is overall pretty cheap since the primary use cases of S3 are storing huge amount of data. I found this simple price calculator to be very helpful.
DynamoDB has a little more complicated pricing model. It depends on a pre-specified throughput capacity (in units), a storage price, an optional service named DynamoDB Streams and data transfer fee.
The throughput capacity is used to provision the table. It includes a read and a write capacity, which hides a lot of complexities from developers. After the throughput capacity is specified, a flat, hourly rate will be charged. The storage price is on a S3-like model, where a unit price per GB is charged, including the uploaded data size and a fixed indexing overhead. Again, a price calculator is available to estimate your monthly charge.
In summary, S3 and DynamoDB are both great AWS services with different use cases in mind. S3 is a general storage solution targeting users with needs to store a huge amount of unstructured data. DynamoDB is a No-SQL database set out to solve the scalability challenge for many web applications.
For us, since the offline metrics storage can be pretty large with potential unstructured data such as figures, S3 seems to be the viable choice of the two. Plus, the summarized offline metrics are consumed by an internal web app with an infrequent fashion - S3 could help us to save a few bucks as well.
As always, I would really appreciate your thoughts/comments. Feel free to leave them following this post or tweet me @_LeiG.
]]>json4s
to be an effective option for my use case. Here are some simple code snippets to get started with this library.JSON AST is used to model the structure of a JSON document, which is the fundamental building block of json4s
.
1 | sealed abstract class JValue |
Features are implemented based on AST such as functions used to transform the AST itself, or between the AST and other formats.
We can serialize Scala objects, such as case class
into JSON easily with json4s default formats.
1 | import org.json4s._ |
And, walla, you get what you want!
1 | { "id": 1, |
As you can see, the serialization is super easy for simple case classes and it supports the following out-of-box:
Of course, you might already started asking how about more complicated use cases. Luckily, json4s supports customized serialization logic as well with a little bit of extra work.
For illustration, let’s assume our Employee
case class is not serializable by default, we can plug in a customized serializer to achieve the same results.
1 | class EmployeeSerializer extends CustomSerializer[Employee] (format => |
The syntax is pretty straightforward to create a customized serializer and you can just plug it in as you would do with the default one.
The deserialization is just a one-liner if you happen to serialize the JSON object with the above logic.
1 | import org.json4s._ |
In fact, for any JSON string, we just also deserialize it by
1 | implicit val formats = DefaultFormats |
I find json4s to be a pleasure to work with because of its simplicity and powerful features. I think it could be a good go-to choice for Scala JSON serialization/deserialization, unless you are not using the Play Framework (Play has its own utilities to work with JSON and I am saving it for a later post).
As always, I would really appreciate your thoughts/comments. Feel free to leave them following this post or tweet me @_LeiG.
]]>RSS is still alive, but apparently it is no longer the dominant way people keep up with blog updates. Social media is the new norm for content sharing. To get your message out to a big and engaged audience, you should start to maintain some social media presence (most likely you already had it anyways) and make your site share-friendly.
AddThis makes it easy for readers to share articles to multiple social media sites. You have probably seen it from other sites already, but it provides a sharing bar so that, with a single click, readers are able to share contents to their favorite social media channels. Its freemium version comes with basic analytic tools and simple HTML snippets to be added to your website. You can even configure the basic design, both for desktop and mobile, of the sharing bar.
After the initial setup, it is just a matter of copy/paste the generated HTML code into the <body></body>
of your website.
1 | <!-- Go to www.addthis.com/dashboard to customize your tools --> |
And walla! you would have a beautifully designed sharing bar like the one on the right side (or bottom, if you are on mobile) of this post on your own blog. Want to test it out? You could try to share this post to your social network via my sharing bar ;-).
Now that your readers can share your blog posts easily, you probably want to optimize how the others see the shared content. And the end of the day, a better formatted content helps to improve your click through rate (CTR). Luckily, there is the Open Graph protocol. To enables any web page to become a rich object in a social graph via Open Graph, you need to add some meta
tags to the <head></head>
of your pages.
More details can be found on its website, but there are four required tags.
og:title
- The title of your object as it should appear within the graph, e.g., “The Rock”.og:type
- The type of your object, e.g., “video.movie”. Depending on the type you specify, other properties may also be required.og:image
- An image URL which should represent your object within the graph.og:url
- The canonical URL of your object that will be used as its permanent ID in the graph, e.g., “http://www.imdb.com/title/tt0117500/“.HTTPS
is a protocol for secure communication over network, which provides authentication of the websites being communicated. It is especially useful for websites that involve sensitive information, such as login and payment. But there is a general push for secured communication for all websites. Most famously, Google uses HTTPS as a ranking signal in its algorithm, which, by itself along, is enough reason for anyone to adopt the HTTPS protocol.
You can pay a few bucks and get a paid SSL certificate that provides end to end encryption, but I decided to go with the free SSL certificate from Cloudflare since I am pretty sure my static blog is safe ;-).
To get that green lock on my address bar, I first follow this tutorial to switch my nameserver from Namecheap to Cloudflare (this step could take up to 24 hours for verification).
And, a few code snippets need to be added to fully enable HTTPS for the site.
In config.yml
add these so that the static contents are served over the HTTPS version.
1 | url: https://www.commitlogs.com |
In <head></head>
, set up canonical link tag so that search engine know to serve the HTTPS version of the site and also redirect users from HTTP version to the HTTPS version.
1 | <link rel="canonical" href=" { { site.url } }{ { page.url } }" /> |
Ever wondering how that cool kid gets his own email domain name? Guess what, you already had one when you registered your domain name. Depending on your nameserver, any domain name comes with unlimited email forwarding and some number of email sending support for free (you can always pay to get more).
The reason I am using Mailgun is that it provides email sending capability by the number of emails sent per month, not by number of email addresses. And, since I am using Cloudflare for free SSL certificate, I lose the free email sending service from my nameserver. Plus, the setup for Mailgun is super easy that you just need to make a few changes with your DNS provider, not even a line of code for your website. Here is a good tutorial if you are lazy to google it out.
Alright, hope you enjoyed this post from the upgraded version of commitlogs.com. I think these SaaS are very handy and can get you a better start on your blogging journey. But, I want to call out the following quote from a successful man, since the only way to get your blog going is to keep blogging.
Content is king.
— Bill Gates
As always, I would really appreciate your thoughts/comments. Feel free to leave them following this post or tweet me @_LeiG.
]]>Read on. You seriously need changes.
I felt exactly the same way and I came to realize these characteristics actually characterize, what I’d like to call, the Learner’s Symptom.
Been in the tech industry, everything is moving super fast with new programming languages, frameworks and tools being developed almost everyday. Take the notorious Javascript community for example. If you were able to follow along (that’s a BIG “if”), you probably have learnt more frameworks than the number of actual projects you have built, excluding those todo list toy projects. Chances are that you come a long way from BackboneJS, to AngularJS 1, to VueJS, to AngularJS 2, to ReatJS and to the next big thing, whatever that might be. Actually, you could check out this post How it feels to learn JavaScript in 2016 for a perfect illustration. Moreover, with the full-stack developer and dev/ops movements, you probably get brain fucked by merely keeping up with all those nouns in the field.
There are literally thousands of things to master in software development.
And it takes 10,000 hours of “deliberate practice” to master any one of them. Well, that might be a little exaggerated, but you get the idea.
As a learner, or, better, lifelong learner as you like to call yourself, you enjoy learning new knowledge and you always hop onto the new things. You read Hacker News everyday and subscribe to Twitter List of programming thought leaders. Your New Year’s resolution probably is to learn X languages or frameworks. You spend most of your spare time working through tutorials or watching online lessons.
And, that’s all good. It demonstrates your passion and persistence. I admire that.
But, that’s not the most effective way of learning. Because, you are most likely learning for the sake of learning. Learning things this way, you are probably just scratching surfaces here and there. Moreover, you are consistently at the risk of burning out. Your biggest accomplishments could only be having learnt X languages/frameworks.
Unfortunately, you might have the Learner’s Symptom.
Why have I got the Learner’s Symptom, you might ask? I think it is because 1) you are self-motivated to get better, but 2) you lack a clear end goal.
The logic goes like this: you are very motivated so that you are constantly learning new things that you think could be helpful to your success. But, because you don’t have a clear goal or definition of “succuess”, it is unlikely you would have a clear path to it. That means, you don’t actually know which skills or knowledge are helpful. Well, what would you do as a self-motivated person? You set out to learn them all! That is, you learn for the sake of learning.
To not learn for the sake of learning, I would suggest you to adopt goal-oriented learning. That means, you should always set clear median-term goals, which should be specific, measurable and attainable. “Be an awesome developer” could be a long-term vision, but that might not be much helpful to define a clear path to get there. Instead, you should break that vision down to clear goals, such as “learn full-stack skills by building a blog app with the MEAN stack” and “deploy an web app to AWS and scale it to 10X traffic”.
More practically, I find it is very useful to append a goal with a comprehensive project. I am not talking about those toy projects bundled with tutorials (don’t get me wrong, toy projects are great to learn specific techniques), but a full-fledged one. A serious project would likely to expose you to a lot more challenges. Many of them are beyond the scope of a specific technology, but are essential to your overall capability as a developer. As a bonus point, it is just a rewarding experience to actually ship something to the Wild West World (www), a.k.a. the internet.
Speaking from personal experience, by embracing goal-oriented learning, I started to work on projects with more purpose. I find myself becoming more effective because I need to prioritize my time to best achieve my goal. That often means actually ship a project, instead of spending time purposelessly going through online tutorials.
Learning is good. In fact, I am all for lifelong learning, but I would urge you to learn with a specific goal in mind. Never learn for the sake of learning. You should master the skill of learning and always use it to serve as means to reach your goal. At the end of the day, learning is not your goal; it merely is a tool to get you there.
I would really appreciate your thoughts/comments here. Feel free to leave them following this post or tweet me @_LeiG.
]]>2016 is an exciting year for me both professionally and personally.
Professionally, Steve Jobs’ famous quote from the 2005 Stanford Commencement has always been inspiring to me, and I think I finally have found what I love to work on this year. It took some years and detours, but the feeling is truly amazing and my motivation is at all-time high.
You’ve got to find what you love. And that is as true for your work as it is for your lovers. Your work is going to fill a large part of your life, and the only way to be truly satisfied is to do what you believe is great work. And the only way to do great work is to love what you do. If you haven’t found it yet, keep looking. Don’t settle. As with all matters of the heart, you’ll know when you find it. And, like any great relationship, it just gets better and better as the years roll on. So keep looking until you find it. Don’t settle.
Personally, I have became a father in November. Crazy crazy experience and I have been enjoying every little moment with my daughter. I can’t wait to look at the world in a fresh new way and learn many things through the eyes of a baby.
Alright, I think it’s time for some serious reflections.
Feel comfortable stepping out of my comfort zone. As a trained data scientist, writing production code wasn’t my expertise and Scala/Spark was completely new to me, but I took up the challenge anyways and was able to deliver effectively. It’s always a bit shocking to me that not everyone is willing to get out of their comfort zone, because I value challenges like this great opportunity for personal growth. It is almost like someone pay you to learn. Where to find better deals than these? More importantly, it almost always opens new doors for you. Some of the challenges may change your life for good. In my case, because of it, I fell in love with building things and got to actually work as a developer. This experience was an “aha” moment in my life and I think I’ve found what I truly enjoyed doing. Would I find it anyways without taking up this challenge? Possibly. But it would probably be much later.
Be able to execute consistently. There is a saying in the Valley: “Ideas are cheap; execution is the key.” I think consistent execution is the true differentiator. Although there still is more room for improvement, I did a much better job than previous years on this one. The idea of starting a blog has been with me for quite some time and I attempted a few times in the past, but this is the first time that I am able to actively maintain one at commitlogs.com. Besides this, I was also able to execute at work by delivering machine learning models and A/B testing infrastructures to production, and started a little side project (still at early stage, more on it in a separate post).
Figure out techniques to effectively plan and use time. This one has historically been my weakness. With severe procrastination, most of my time was spending at, guess what, thinking about doing something. This year, I have finally come up with some useful time management tactics. It’s a combination of todo list and Pomodoro technique. Every Sunday, I will compile a list of todos for the week arranged by day. For each day, my goal is to finish 8 Pomodoros worth of tasks. Apparently, not everyday is perfect, so I will revise the todo list at the end of each day to reprioritize tasks for the rest of the week. This way, I don’t need to spend energy to think about which tasks to work on during the day and can just use Pomodoro technique to go through the list effectively. Gradually, I have a much better understanding of how my time is spent and learn to estimate time for each task for better prioritization.
Communicate openly and effectively. I am in a pretty wired situation, while my micro-communication skills are not actually that bad, i.e. explain something to others, my overall communication strategy continues to be a pain point. Specifically, it seems that I tend to shy away from hard conversations. My courage of confronting with people and standing up for what I believe is the right thing to do needs some more fuel. I almost feel like I’m too soft and “easygoing”. I believe one needs to be able to speak up for what he believes and spark a meaningful discussion among shareholders.
Stick to a planned life style. There is a theory that any habits take at least 21 days to form. I attempted to foster some good habits using this technique with some success, e.g. I am now reading and practicing guitar pretty regularly. But, when it comes to life style habits, I failed consistently. Specifically, I have most difficulties in getting up from and going to bed on time. I think every strong man should at least has the power to control his own life style.
Execute consistently. This continues to be the development focus for 2017 as I believe execution is the key to everything. If you do the math, 1.0 X 1.01^(365) = 37.8, every little step counts as long as you are consistent.A practical goal is consistently develop technical skills around building things by actually building them.
Form good lifestyle habits. One needs to have the power to have control over one’s own life; otherwise, how could you expect him to have power over anything else? There are a couple of things, but I’d like to call one thing out. That is, getting up at 5:00am everyday. I come to appreciate the morning time, since it seems to be the most high quality, uninterrupted time of a day. That also means, I should be able to get the most important stuff done during that time, but that’s all under the assumption that I can get up early in the morning.
In this post, I am going to discuss, what I’d like to call, the “continuous deployment” aspects of the predictive model system. Specifically, the “test suites”, i.e., the offline evaluation and A/B testing components around model performance, and monitoring/alerting components around feature generation and model validity.
The concepts of offline evaluation and A/B testing shouldn’t be new to most people with some modeling background, since they both are widely adopted techniques. Here I am going to focus on how/why they are incoporated into a predictive model system.
I would compare the offline evaluation and A/B testing components in a predictive model system with the tests (e.g., unit test, integration test, or whatever test) in a general software system, simply because they both need to be run/pass before a model can be actually deployed to production.
A simplified model deployment checklist is:
The offline evaluation is consisted of some performance scores, e.g., AUC and/or F1 score, that needs to pass certain threshold. These scores are calculated off the training/test dataset and serve as an approximate evaluation of the true model performance. It is not as accurate as A/B testing, but it speeds up development iterations significantly, since an A/B test usually takes days to see a significant result if any. I would recommend set a relatively loose threshold for offline evaluation to filter out the obvious losers and pass a set of “good” models to A/B testing.
The A/B testing serves as the gate keeper by running two or more models simultaneously. It evaluates a model performance with true users based on business metrics. In most cases, one would expect the A/B testing results to be consistent with the offline evaluation scores. That is, a better offline evaluated model would win in A/B testing. However, there are times the results are different. In those cases, we should, of course, trust the A/B testing result, but one should also take a step back to think about the reasons behind this discrepancy. My experience tells me that, in those cases, there likely to be something pretty informative to improve the next verison of the model.
These two “tests” help to foster a relative fast model iteration speed and ensure a true model improvement. They are both important steps to achieve an automated deployment with confidence.
In general, good monitoring/alerting setups help to identify possible defects in a system and analyze root cause when things go wrong. For predictive model system, they are arguably more critical and need to be set up with more components than the typical ones for websites. That is, besides the monitoring/alerting on processing time, responsiveness and uptime, we need tracking systems in place for feature generation and model performance.
In a predictive model system, features are usually either generated by periodic offline jobs or read directly from production database (see this post). All deployed models are trained based on training data at the time of model fitting. Therefore, for models to perform properly, the distribution of feature values should be consistent between training data and production data. This seems to be a safe assumption, since, in theory, training data is just a sample of today’s production data. However, in the real-world, there are at least two ways things could go wrong under your nose.
For one possibility, the feature generation jobs may produce erroneous results. It may be due to bugs in the job itself or from upstream data sources. This type of error is close to errors in any software system and we could use similar approaches to set up monitoring/alerting. In addition, it is also helpful to track basic statistics of feature values such as mean, median and variance in case any less obvious things are off (I ran into an instance where all features are generated as 0’s without triggering the failed job alert since the job ran “successfully” with erroneous numerical calculations).
Another possibility is the feature distribution itself may change significantly over time. This could be caused by user behavioral changes led by product changes or other macro changes not directly related to the model itself. Because there is no error per se in such cases, this type of distributional changes is much harder to detect, let alone fix, but it will inevitably compromise the model performance. To catch these unexpected changes, we could try using basic statistics tacking for feature values and/or monitor the model performance online to make sure it is reasonably. In order to evaluate online model performance, a separate offline job is likely needed to gather predicted values versus true outcomes, and compute model performance using the same offline evaluation metrics. The computed metrics is then persisted somewhere in a time-series fashion and used for monitoring/alerting.
With these addtional monitoring/alerting components, one would be more confident in an automated predictive model system and sleep better at night, if not paged by the alerts ;-).
Automation comes with the risk of breaking things.
In this post, I attempted to cover a few components for building reliable predictive model systems and I hope you would find it helpful. Since I just started out to build this type of systems, I am sure there are many pieces that are still missing.
I would really appreciate your thoughts/comments here. Feel free to leave them following this post or tweet me @_LeiG.
]]>Express is a routing and middleware web framework that has minimal functionality of its own: An Express application is essentially a series of middleware function calls.
As part of my own learning, we are going to look at a few examples in this post in the hope to understand how middleware functions
Note that I borrow many examples from this awesome book Web Development with Node & Express by @EthanRBrown and you could find more interesting stuff from the book.
Most of the middleware functions take three parameters req
(a request object), res
(a response object) and next
(the next middleware function), although some have the additional err
parameter for error handling. And these functions are executed in a pipeline, i.e. ordered, fashion. Middleware functions can be inserted into the pipeline by calling app.use()
and passed by calling next()
.
The usual route handler app.VERB
is a special type of middleware that handles specific HTTP verbs, e.g. GET
, POST
, etc and it requires a path as its first parameter.
1 | var app = require('express') |
In the above example, the request terminates with the first route handler. Suppose we rewrite the first route handler with a next()
function, the request will be passed onto the next handler. Note that, if a middleware doesn’t call next()
, it would terminate a request and it should always send something to the client; otherwise, the client would hang and eventually timeout. On the other side, when there is a next()
, nothing should be sent to the client at the moment.
1 | var app = require('express') |
Similarly, a middleware function can be thought as a route handler that handles all HTTP request and, thus, it doesn’t need a path parameter. We could replace some of the above route handlers with middleware functions, but the results would change accordingly.
1 | var app = require('express') |
Admittedly, this is not a particularly interesting example, but note how the results change because middleware doesn’t have a specified path. Also, this is not a typical use of middleware functions. Instead, there is a commom pratice to have a “catch-all” middleware function as the very last one that returns a status code 404 (Not Found).
1 | var app = require('express') |
The pipeline logic of route handlers and middleware functions should be pretty clear in the above examples, but things may get a bit tricky in the real world when there are many route handlers and middleware functions nested together. The logic stays the same, but it would need extra care to make sure users can access the right content.
To make my point, I am borrowing an example from @EthanRBrown‘s book as a simplified version of the real world. You should be able to walk through it with the described logic as long as you look closely.
1 | var app = require('express') |
Notice that, if a request goes to \b
, the client would see a 404
, but, if a request goes to \c
instead, it would get a 500
, depending on whether an err
is passed to the catch-all middleware.
Hope you get a good grasp of how middleware works with ExpressJS. With a large, active community, there are many useful middleware functions being developed and most of the times you don’t need to reinvent the wheel. Although, unfortunately, there currently isn’t an index for all the middleware available, one thing you could try is to search npm
for “Express”, “Connect” and “Middleware”.
Conventional wisdom tells us to put our 100% effort into something that we really enjoy doing and strive to be the best on that single thing, e.g. being the Michael Jordan on basketball, but @dhh says something different and he himself wears many hats with great success. As a programmer, he developed the Ruby on Rails framework, which is one of the most widely adopted web development framework; as a entrepreneur, he bootstrapped the company Basecamp (previously known as 37signals) with Jason Fried that has been profitable for more than 10 years; he is also a Le Mans & WEC class-winning race car driver, a hobbyist photographer and a public speaker.
When asked about how he had accomplished so many, @dhh attributes it to the 80/20 rule. The idea is that you can either devote 100% of your effort to be the absolute best in one thing or diverse a little bit to be the top 15% ~ 20% in, let’s say, five things. The latter is also tremendously valuable. With a mix of good skills, your strength can bend and stretch, which is sometimes more important in life.
I couldn’t agree more on this point and that’s actually how I generally think about self-development as well. I think, if someone has one thing that he/she is willing to devote 100% of his/her life to it, that’s absolutely lucky and he/she should definitely pursue that one thing to the best. However, not everyone is lucky enough to find this one thing that they are willing to give up everything else for; or, arguably, it may not even exist for everyone. For me, I like a couple of things in life and I want to do each one of them well enough (in the top 20% as @dhh puts it). For example, I like programming and making things that people find useful, but I also enjoy playing guitar and spending time with my family. I wouldn’t want to trade one thing for another. So, what I should do is to narrow down those things to a reasonable amount (it’s extremely hard to be in the top 20% for more than 5 things if you calculate the compounding probability) and just stick to them for a long time to get better.
A practical way to getting better is to get into the flow. It is the key to get you to the top 20%, and it may come easily or through enough practice depending on the nature of the task. Flow generally comes when you work on something you enjoy for an uninterrupted period of time, so it is important to block about 3 hours everyday for deliberate practice on the multipliers, i.e. the most impactful things. To make it more efficient, you should limit yourself to only work 3 hours on it per day to artificially create the sense of urgency, meaning, if you don’t get a good 3 hours, you lose the day of work. With the limited blocked time, you would really achieve the peak of your producivity with best efficiency.
Another notion that @dhh mentions is the so-called self-sufficiency. He came from refusing to learn programming to becoming one of the best programmers all because he doesn’t want to bother people to make things happen for the gaming website he was running. He is motivated by the idea that he should be self sufficient and make things work by himself. This is not all that good in some scenarios, but it drives him to where he is today in the world of programming.
Be an introvert myself, the power to be self sufficient also motivates me in many ways, most recently on my career change. I started out as a data scientist that analyze data and build predictive models, but, over the time, I find myself constantly dependent on others to actually bring the models I build to customers, because they need to be implemented in production. I felt that part both inefficient and annoying, so I decided to get my hands dirty and write production code myself. Over the months, I jump from like of the outcome to like of the activity itself, i.e. programming. Eventually, I decide to be a professional developer and it just opens up a whole new world to me. I am now enabled to work on my side project as a sole developer to build a product from scratch.
Besides the thoughts mentioned here, I am also really inspired by what @dhh have presented on lifestyle design and his view on how to build a successful business without VC funding. For anyone who is interested in the interview, here is the link to the podcast. Hope you would enjoy as well!
]]>Time flies and it has been a year since then, I feel this might be a good time to reflect some of the things I noticed from this career change.
There are the usual consensus. The execution speed in the tech world, where product features are developed and tested continuously, is 10X faster than academia. In academia, the equivalent of shipping products is to publish papers, which is a process often measured in years (truth being told, I still have a paper under review, which was submitted almost a year ago). Similar with direct impact, technology enables products to scale and affect massive users in near real-time, whereas most scientific research only have direct influence on a very small and specialized community of researchers, although they may eventually have a significant impact on our society.
But, most importantly, I am thrilled to be part of product initiatives where makers of different types working together to build ideas into actual products and ship them to millions of users. The experience of building something from 0 to 1 is just mind-blowing. It feels like drugs - you will get addicted to it in a good way. Although this is all relatively new to me, I am already hooked up to it and I think Albert Einstein explained the reason well.
Scientists investigate that which already is; Engineers create that which has never been.
- Albert Einstein
With such experiences, I am now a firm believer that the future belongs to the makers. With the skills and passion, makers can make the world better by delivering their crafts, and technology is enabling them to scale it up and reach a very large audience.
Looking forward to the next few years, I should just continue to improve my craftsmanship by doing what I love, learning from others and keep making stuff. As Steve Jobs once said,
]]>You can’t connect the dots looking forward; you can only connect them looking backwards. So you have to trust that the dots will somehow connect in your future. You have to trust in something – your gut, destiny, life, karma, whatever. Because believing that the dots will connect down the road will give you the confidence to follow your heart even when it leads you off the well worn path; and that will make all the difference.
The Spark MLlib library provides an easy-to-use model train/test process that is familiar to data scientists to play around and fine tune predictive models. A pretty standard offline model training process often involves these following steps, which are wrapped into a pipelining type of operations in Spark MLlib (see examples).
However, deploying predictive model to a production environment, or serving the model in production, is a bit more complicated. Its architecture largely depends on how the model will be used. At very high level, predictive models often are used to score some instances, e.g. the risk score of fraud transaction or the likelihood of clicking on ads. This scoring operation can be offline or online, depending on its application. Offline scoring means the model doesn’t needs to score an instance in real-time and online scoring means the model is required to score with real-time input and low-latency. In this post, I am going to touch on a few common architectures and their use cases.
For models used for offline scoring, we can used the batch prediction architecture. That is, we don’t really serve the model online; instead, the actual scoring happens in batches offline and we just need to serve the scores produced by the model online. This architecture can be combined with the offline model training setup because both are in an offline environment. We can directly use Spark MLlib’s model training pipeline to fit a model and then store the predicted scores into a database and let our online service talks to that database to serve the scores.
This architecture can be summarized as
For online scoring, we do need to serve the model itself online to respond to incoming signals in real-time. A simply, but effective architecture is to hard code the actual model into your online serving service. This is straightforward for regression based models, such as linear regression and logistic regression. Since the scoring logic of these models can be explicitly coded up easily. At the end of the day, scores from regression based models are just a multiplication of features with its fitted coefficients. Note that the feature generation logic should be the same between offline model training and online scoring. In this case, we just need to store coefficients from offline training into a database so that the online serving service has access to it in order to implement the scoring logic.
This architecture can be summarized as
For more sophisticated model, the hard-coded model logic can get very complicated and error-prone. It is preferred to serve the offline trained model directly to production. Luckily, with latest Spark, we can persistent the trained model/pipeline into a physical storage and then load it back for scoring. This can be easily achieved via the following command.1
2
3
4
5
6// suppose we have a trained RandomForestClassificationModel model
trainedModel.save("s3n://.../trainedModel")
// load the same model back
val sameTrainedModel =
RandomForestClassificationModel.load("s3n://.../trainedModel")
Internally, the model metadata and parameters are saved as JSON and the data as Parquet. One thing to call out here, in order for this to work, the online service needs to run Spark in local mode; otherwise, it can get a little tricky to load the model back.
Compared to the architecture of hard-coded model, we directly save the model to storage and load it for scoring. The logic is pretty straightforward and can support more models, although it is not as light-weighted as the previous approach, due to extra requirements on the serving service.
This architecture is similar to the hard-coded model, but store the trained model directly
More generally, we can use the Predictive Model Markup Language (PMML) to represent predictive models and communicate it to other language/framework. The idea is similar to how web services talk to each other via a standard protocol such as JSON or Thrift. PMML is the de facto standard language used to represent predictive analytic models. It is based on XML and allows for predictive solutions to be easily shared between PMML compliant applications. Spark supports model export to PMML for a list of models, such as LinearRegressionModel
, RidgeRegressionModel
and LassoModel
(see full list). Interestingly though, Spark doesn’t support load model from PMML directly. But the one-way conversion is very easy using the following syntax.1
2// suppose we have a trained model
trainedModel.toPMML("/tmp/trainedModel.xml")
Again, the architecture is very similar to model persistence, since we just use another format to represent the model in storage
From prototype to production often involves a whole set of different considerations and trade-offs. Some extra implementation work must be done to make a balance between a fast iterating offline training pipeline and a robust online model serving service. It is great that Spark provides us with different options so that we can leverage them based on our specific use cases.
Of course, there are other interesting topics around deploying predictive model to production that I am very interested in and will write about later. For example, how do we think about regular model update/re-train and how to leverage our A/B testing framework to automate this process? If you are interested as well, stay tuned (updated: Predictive Model System - Some Missing Components)!
]]>If necessity is the mother of invention, then laziness is the father.
Recently, I came across a great story behind park.io, a service helps you to backorder domain names. At the 1000-feet level, the guy wrote a script that automatically gets any expired domains of interest. Simple idea, right? This company now generates $125K revenue per month with only one employee - the founder himself.
I bet many people had similar ideas before. We can talk a lot around why ideas are cheap and only execution is the key, but what’s more fascinating to me in this story is how the founder get started with this idea - he wanted to buy a domain name for another of his idea, but was too lazy to check regularly to see when it expires. Instead, as every good engineer would do, he wrote up the initial script to automate this task.
Good software engineers are lazy. We hate doing mundane tasks. This trait is inherent to us because our job is to do automation. We are constantly looking for opportunities to automate processes, sometimes even ourselves, e.g. the continuous integration/deployment concept. The DRY (don’t repeat yourself) rule is such a guiding principle that it is applied widely, ranging from coding, architecture, testing to even documentation.
Software engineers are empowered to be lazy. We are trained with the skills and, more importantly, the mindset to automate repetitive tasks. But we tend to take this idea of automation for granted and forget that there are huge opportunities here to ease the life of normal people. Besides writing scripts to automate our own tasks, we can build tools to provide Laziness-as-a-Service (Laas) to others and, as people like to put it, make the world a better place. Out of many, Amazon’s Dash Button is a great example that successfully brings a little automation script into everyone’s life. Since its debut in early 2015, it went through rapid growth with more than 150 brands and Dash Button orders now occurring over twice a minute. Simple idea like this provides LaaS to normal people and fundamentally changed the way people live their daily life. In this sense, you don’t have to build the next Google or Tesla to improve the quality of life for everyone.
Let’s face it - laziness is human nature. There is no point to deny it or to be ashamed. As smart engineers, we should instead use our skills to provide LaaS to help people be lazy and escape from mundane so that they can focus their energy on the creative tasks.
]]>Code review serves multiple purposes. On a very high level, it helps to
With all these benefits, code review comes at the cost of short-term development speed, although it saves time in a long-term perspective. To be frank, it will slow down your day-to-day work. This inevitably happens because 1) you need to wait for other people’s availablity and 2) you are not writing the perfect code (let’s agree to disagree on this one).
So the question becomes - how to make the code review process more efficient?
As a junior guy, I often find myself on one side of the table, where my code are reviewed by others, so I am eager to make this process more efficient. Over the course, I learnt a few things to make life a bit easier for both reviewers and myself. It would be a lie to say I can stick to these rules every time, but, when I did, they helped to move things faster.
Review broken code is a waste of time for both you and the reviewers. Obvious bugs and compiler errors should already be handled prior to code review, if you had tested thorougly against your development/staging environment. This would save a significant amount of time and build trust between you and the reviewers. At the end of the day, the responsibility is on you to make sure no breaking changes/bugs are introduced. Code reviewers are there to help with their fresh pair of eyes for non-trivial buggy logics that might be hard to detect when look too closely.
Breaking down changes into small patches not only speeds up the code review process, but also helps with the development process. On the developer side, it forces you to think critically about the structure of your change. Often times, by isolating small pieces of logic out of a large change, your code becomes cleaner and less error-prone with easy testibility. On the reviewers side, a small patch of code is easier to follow and helps to keep their eyes “fresh”. There is the human psychology part as well. People tends to procrastinate on big tasks and it is just much less intimidating to approve a 50 line of change than, say, a 1500 line one.
The goal of always submitting small patches is to ensure quick turnaround. With quality feedback within a day or two, this wouldn’t block the development of the next patches. Admittedly, things may not go smoothly every time. When the reviewers are delayed for whatever reasons, you may find yourself creating a large stack of small changes with the need of constantly rebasing on top of the previous patches. But, overall, this technique works well from my experience.
Good commit message is the best way to communicate context about a change to fellow developers and reviewers. A commit message includes a subject line and a body. The latter is optional depending on the complexity of the change. The subject line summarizes the change and, if there is a body, it should focus on the what and why parts of the changes, as opposed to how (the code explains that). In this way, your reviewers can quickly get the context and general idea of the change so that they can spend most of their time on the actual code.
There are seven rules to write a good commit message (I copy&pasted from google). Note that these rules should be treated as code style guide - they should be enforced as part of the code review process. They help to maintain concise and readable commit logs, which is critical to any projects’ long-term success.
Like a lot of things, the key to make your reviewers life easier is to put yourself into their shoes. The things outlined here are the ones I would like to see if I were the reviewer. Now, imagine you were in that position, what kinds of code reviews make you happy? Sooner or later, you will be on the other side of the table. So, you might be better off starting to think about this question now and make the changes you would like to see happen.
]]>Up till now, I have been hosting most of my side projects on Github. It has been huge in the open source and enterprise world as de facto git
hosting service. But, lately, I came across Gitlab, which seems to bring the goodies from Github and Bitbucket all together.
As I am planning my new side project (more on this later :-)), I want to revisit my default and see if Gitlab could actually be a better fit. Omitting the details, here are a couple of things that I think are must-have for this project:
With these in mind, I did a little bit of research on Github and Gitlab.
Not suprisingly, both Github and Gitlab, or any git
hosting services in that matter, have options for private repos. At the end of the day, it is all about how much it costs.
If you were already a paying user for Github, there is really no additional cost to add more private repos and the comparsion dosen’t really make any sense. That been said, since I am not a paying user today, this one seems to be a no-brainer to me (I agree a few bucks a month isn’t that bad, but I am just a poor guy that thinks every penny matters).
Continuous Deployment (CD) aims at building, testing, and releasing software faster and more frequently. It is almost the standard for developing web applications nowadays.
On this front, Github doesn’t provide any support for CD directly, but there are a lot of third party integrations available, e.g. Travis-ci, Snap-ci or Jenkins. These thrid party tools ranges from open source and free to a fixed subscription fee per month.
Gitlab offers a built-in CD support, known as Gitlab-ci, for free with a partenership with DigitalOcean. The CD process integrates nicely with Gitlab’s UI and host everything in one place.
There are definitly more designated and mature CD support out there for Github, given its longer history, more popularity among the open source community and lack of its own implementation. But the big plus for Gitlab to me is that it integrates CD within the platform so that I can have one less extra things to worry about.
As a projects grows, there will be more things flowing around and people lose track of them. Thus, I value good project management tools to be important factors to the success of any projects.
Both Github and Gitlab provides good code review, wiki page and issue tracking tools that are crucial to day-to-day development, but Gitlab supports more features such as associate attachment with issues (very helpful to frontend debugging) and a work-in-progress (/wip) status to avoid accidentally merging unfinished code.
As you might have already guessed, I am leaning towards using Gitlab for my next side project at this point. It seems to provide more useful features out of the box with less cost. Moreover, isn’t it the spirit of side projects to try out new and shiny things?
]]>To help people get started or transition to this new version, I started a series of blog posts to cover Spark 2.0 related stuff. This article in particular talks about one of its major API updates; that is, the introduction of a new interface Dataset
(Well, technically, Dataset
was introduced in Spark 1.6 as an API preview, but it really becomes stable in this new release). With Dataset
and its two predecessors RDD
and DataFrame
, Spark now has three major APIs for operating large datasets.
RDD
(Risilient Distributed Dataset) was the primary API introduced since Spark 1.0. It essentially is an immutable distributed collection of elements of your data that is partitioned across nodes in the cluster. It is functional-oriented and emphasizes on immutability, which provides a simple, OOP-style API with complie time type-safety, but may cause issues with garbabge collection due to too many temporary objects being created during computation.
RDD
is lazily evaluated. It provides two types of operations, i.e. transformations and actions. The transformations, such as map
and reduce
, only creates a new RDD
representing the transformed data and defines the operations to be performed . The operaions are not actually performed until an action is called. You can find a list of these operations on the Spark Programming Guide.
RDD
will continue to be the building block of Spark, since Dataset
and DataFrame
are built on top of it. It will be the low-level API if you want more explicit control over operations or process unstructured data. But it would not enjoy many of the optimizations and performance benefits available with Dataset
and DataFrame
due to its lack of structure information and the help brought by Spark’s internal Catalyst Optimizer.
Dataset
is formally introduced in Spark 2.0 and is positioned to take over DataFrame
(introduced in Spark 1.3) by bringing in some of the advantages with RDD
, such as compile time type-safety. I am combining Dataset
and DataFrame
here together mainly because DataFrame
will merely be an alias for Dataset[Row]
starting from Spark 2.0, where Row
is a generic untyped object. Alternatively, for a typed object, such as a case class Person
, you can create a Dataset[Person]
, similar to RDD[Person]
, to take advantage of the type-safety.
Dataset
optimizes data storage via encoders to eliminate the cost of deserialization and garbabge collection, and improves performance by using Catalyst Optimizer to generate optimized query plan. Its overall performance is improved significantly (see this example). The trade-off here is that Dataset
is limited to classes that extend the Scala Product
trait, e.g. case class
, whereas RDD
can be used with any objects.
Even better, Dataset
can be seamlessly convert to RDD
by calling the .rdd
method.
1 | // suppose you have personDS: Dataset[Person] |
And, vice versa, with a little bit extra work, you can also convert RDD
to Dataset
.
1 | // suppose you have personRDD: RDD[Person] and spark: SparkSession |
Starting from Spark 2.0, I would imagine Dataset
to become de facto API for users to operate with on a daily basis and RDD
to be used only when lower level functionality and control are needed. The space efficiency and performance gains with Dataset
are very significant for most use cases - at least for me, dealing with structured or semi-structured data is the norm.
As always, thanks for your time and hope this post is helpful. If you have other Spark 2.0 related questions, you should check out this series of posts or leave comments below.
]]>